")

")
")
sceye-Explorer (PC)
A universal toolbox - the sceye-Explorer is scanning multipage documents and allows to manage these documents in the filesystem. Beside this a lot of additional features are available.
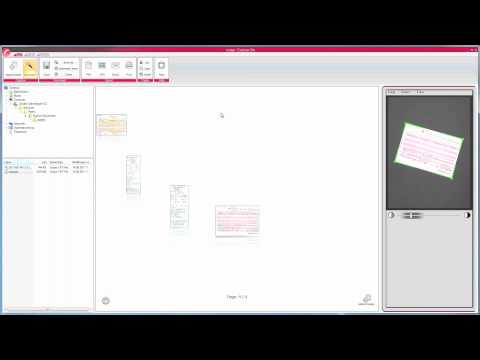
sceye Explorer Overview
The sceye Explorer is a compact document management system based on files and is controlled easily and intuitively through a ribbon bar similar to the that of MS Office applications.
Video-Tutorial
The most important function sections of sceye-Explorer are explained in an overview below:

1) Main Menu
As well-known from the Windows Explorer and other Windows applications, all essential functions of a program can be accessed with the main menu. If you click on one of the three tabs, the Toolbar below changes and allows access to the respective function-section.
2) Ribbon bar
The ribbon bar offers the function sections of the three main menu entries - Start, Profiles and Options with their respective sub-sections.
3) Folder List
With the folder list and the document list you specify the place where files are saved resp. where files are loaded. The folder list displays the folder structure of your workplace as you know it from the Windows Explorer. If you click on the plus in front of a folder, the folder content is displayed. If you click on a minus, the folder content is hidden. If you click on a folder symbol, the files in it are displayed in the document list below.
4) Document List
This is a list of all documents and/or files (depending on the display settings) in the current selected folder. When the mouse pointer is moved over the documents, a preview image of the first page of the respective document is displayed (this is however, only possible with TIFF files), so that it isn't necessary to open files for a quick overview. A double click on a document opens it in the preview window.
5) Preview Window
In the preview window you can view documents and edit them in various ways. A new scanning procedure can also be started from within the preview window.
6) sceye Panel
The sceye panel is the centerpiece of the sceye Explorer. All important parameters for scanning a page are set here. A small preview of the page to be scanned makes it possible to position the page correctly and to assess the exposure situation in the scan area. The exposure is usually adjusted by an automatic exposure correction. You may also set the parameters via the menu or with the plus/minus keys manually.
Scanned pages are first displayed in miniature view in the preview window and can be moved, deleted or edited there. Documents that have already been saved and are opened out of the document list will also be displayed in miniature view.
Scanning
At first take care that you have selected a profile suitable for your intended purpose resp. that you have set the required parameters in the sceye panel manually. (see below)
To scan a page that should be appened to the current document, click on "Append page" in the preview window (shortcut: Spacebar). The progress of the scan procedure can be followed with the green light-bar at the lower edge of the sceye panel.
If the page has been scanned correctly, it is displayed in miniature view in the preview window, sorted behind the last scanned page, or as the first page if the document has been empty so far.
Tip: To speed up scanning, note the laser projection. For scanning, the laser is switched off briefly and switched on again after one second. You may now turn the page. The scan itself is now complete, even if the computer has to perform some image optimation tasks.
Scan profiles
Profiles are predefined document camera settings for various purposes. Depending on the profile several settings are adjusted at the same time so that you can select the correct scan settings fast and easily.
To select a profile, click on the tab "Profiles" in the main menu. The following button bar is displayed:

The following profile categories and profiles are available:
-
Document Profiles: These profiles are used to archive documents in the best quality possible, while large file sizes are accepted. You can choose whether pages shall be scanned in colour, greyscale or black and white.
-
Email Profiles: Use these profiles if you want to send documents via Email. For this purpose the file sizes are kept as small as possible and certain compromises regarding the document quality are accepted. You can also choose here if pages shall be scanned in colour, greyscale or black and white.
-
Picture Profile: Use this profile if you want to scan pictures. For this purpose other filter settings are used, than those which scan pages with text.
-
Auto-crop: Cuts documents automatically to the document edges detected during the scan procedure.
sceye panel
In the sceye panel, various parameters can be set that specify how and in what quality a page is scanned:
-
Colour: In the menu "Image" you can specify whether you want to scan a page in colour, greyscale or black and white.
Please note: For optimal colour scans a white calibration should be performed beforehand (see below).
-
Resolution: In the menu "Image" you can set the resolution in four levels between 100 and 400 dpi. The higher the resolution, the higher the scan quality. Documents in higher resolution however, require more disk space. For most purposes a resolution of 300 dpi should suffice.
-
Brightness: In the menu "Options" you can specify if the brightness should be adjusted automatically. If not, you can manually increase or decrease the brightness stepwise.
-
Contrast: The contrast can be set with the slider at the lower edge of the sceye panel.
-
Filter: In the menu "Options" you can choose between a text filter or a smooth filter. The text filter improves the scan results for text pages, while the smooth filter is used to scan graphics and photos. If you don't want to use a filter, choose "No filter".
-
In the menu "Extras" you can switch the camera's own light and the positioning laser on and off. You can also specify here if the scanned page should automatically be cut to the document edges detected during the scan procedure.(Auto-crop)
-
White Calibration: For optimal colour scans you should perform a white calibration beforehand. This is done by scanning a white page that is used to adjust the required color calibrations. Put a white page below the camera and select "White calibration" in the menu "Extras" of the sceye panel. The colour calibration is done automatically.
Page rotator
To magnify a page, double-click on the respective miniature display and use the scroll wheel for fine adjustment. The mouse pointer turns into a magnifier symbol. Keep the left mouse key pressed and move the symbol across the page to enlarge a part of the page as with a magnifier glass and to check the scan result in detail.
If you click on the tool symbol in the lower left-hand corner of the preview window you can set various parameters to specify how your documents are displayed in the preview window. Use the menu "Zoom" to specify the magnification factor exactly. The magnification parameter always refers to the page that is currently in the foreground of the miniature view. The following settings are available:
-
Overview: If a page has been magnified, use this to return to the miniature view.
-
Zoom on page hight: The page is magnified so that the page hight is the same as the hight of the preview window.
-
Zoom on page width: The page is magnified so that the page width is the same as the width of the preview window.
-
100%: The page is displayed in maximum magnification.
-
Zoom in/zoom out: Use this to enlarge or to shrink the page stepwise.
Even better: Use the scroll wheel of your mouse to zoom in and zoom out of your document fast and comfortably.

Editing single pages in the preview window
Click on the miniature view or a magnified page with the right mouse button to access the following editing functions:
-
Delete Page: The current selected page is deleted from the document.
-
Move Page: Click here and a window opens to specify to which place in the document the currently selected page will be moved to.
-
Rotate Page Left: The page is rotated 45° to the left.
-
Rotate Page Right: The page is rotated 45° to the right.
-
Rotate page by arbitrary angle: Click here and a window opens to enter the rotation angel manually or to increase/decrease the angel stepwise with the two arrow keys. In a miniature view the result of a rotation is displayed before execution.
-
Cut Selection: Keep the Ctrl key pressed and the mouse pointer turns into crosshairs. By keeping the left mouse button pressed you can now select a rectangular section of the current page. With the function "Cut selection" this section is removed from the page and replaced with a white area.
-
Copy page to clipboard: The whole page is copied to the Windows clipboard e.g. to insert it into another document.
-
Crop to Selection: Keep the Ctrl key pressed and the mouse pointer turns into crosshairs. By keeping the left mouse button pressed you can now select a rectangular section of the current page. With the function "Crop to selection" the current page is cut to this section and the rest of the page is removed.
-
Print Page(s): Click here and a standard Windows dialogue window opens to specify which pages in how many copies should be printed
To access further editing functions for a whole page, click on the tab "Start" in the main menu. The following functions are available in the section "Pages" of the ribbon bar:
-
Cut: The current page is copied to the Windows clipboard and deleted from the document.
-
Copy: The current page is copied to the Windows clipboard without being deleted from the document.
-
Insert: If there is a page in the Windows clipboard, use this function to insert it into document behind the current page.
Save and Load Documents
Click on the "Start" tab in the main menu, and in the section "Document" on the ribbon bar to access the following functions for saving a document:
-
Save as: Click here and a window opens in which you can enter a name for the document.
-
Automatic Save: Click here and the sceye Explorer specifies a name for the document automatically. The file name gives the time when the document has first been saved in the format year-months-day-hour-minute-second.
-
Close: Click here to close the document that is currently displayed in the preview window.
-
Save: Click on this button to save a document that has already been given a file name. If no name has been given, the same dialogue window opens as when you click on "Save as".
To load a document, select in the folder list the folder where the document is saved and double-click on the file name in the document list.

Export Documents
In the section "Export" the following functions to export a document are available:
-
PDF: Export into the PDF file format. If you click on this button a dialogue window opens to specify the name of the PFD document.
-
JPG: JPG is a format for digital image files that allows high compression rates and therefore small file sizes, depending on the compression factor, however, at the expense of quality and accuracy. If you click on this button a dialogue window opens to specify the name of the JPG file.
Please note: Since only one page can be saved in a JPG file, multi-page documents are saved in several (consecutively numbered) single files.
-
Email: Click on this button to send a scanned document via email. Your standard Email application will be started with the document as attachment of a new message.
-
Print: Click here to open a standard Windows dialogue box and specify which pages should be printed in how many copies.
Options and Settings
To access several settings that affect the operation of sceye-Explorer, click on the "Options" tab in the main menu. The following list is displayed:

Archive Folder
The archive folder is the default folder that is displayed after sceye-Explorer has been started. To set another folder as the archive folder:
-
Select the desired folder in the folder list.
-
Click on "Set archive folder" and select by left clicking on your mouse.
If another folder is selected in the folder list and/or the document list, simply click on "Go to archive folder" to return to the archive folder.
Software Settings
To change the basic settings of sceye-Explorer, click on "Software Settings". The following settings are available:

-
Select Language: If you want to change the language that is used for the menu and help texts of sceye Explorer, select a new language from this list.
-
By clicking on "Update language", sceye-Explorer will check if a more up-to-date language package is available. This will be automatically updated if so.
-
Default Archive Folder: Here you can specify the default archive folder that sceye-Explorer will use when started.
-
Save Document Behaviour: You can choose here whether the document currently being edited will be closed after it has been saved or after it has been exported as a PDF.
-
Frequency of Power Supply: You can set the frequency of power supply here for your current location. In Europe, Asia, Africa and Australia it is usually 50 Hz, in North America, however, it is 60 Hz.
Please note: sceye takes the frequency into account when calculating the appropriate exposure time. This prevents a triation caused by the frequencies, say for example, of a fluorescent tube.
-
TIFF File Format (for greyscale and b/w images): The sceye software saves documents by default in TIFF file format. Here you can select the used compression method. The Jpg compression allows for smaller file sizes. Lzw compression is supported by more applications and system platforms and ensures higher compatibility.
All changes are activated when you click on "OK" and then close the settings window. If you want to cancel the changes, click on "Cancel".
Compact Mode
To save space on the Windows desktop, you can hide the menu of the sceye Explorer with a click on "Compact Mode". The Toolbar is only displayed if you click on a tab of the main menu and only until you have clicked on one of the buttons.
To leave the compact mode, click again on the tab "Options" and then "Compact mode" which is coloured yellow when the compact mode is active.
The Book Mode offers the comfortable capturing of books and is only useable in connection with the sceyeX A3 camera. This can be selected in the camera alignment menu, which is located in the right-hand corner above the preview area. (See Abb. 1)

The basic function of the Book Mode is to seperate both book halves from the middle of the book and to remove thumbs in the border area whilst pressing the book flat.
Firstly, it must be assured that the A3 document is properly aligned to the camera. (See abb. 2) You then need to adjust the book being scanned by referring to the middle line in the preview screen. The aim is to make the line congruent with the book seam.

In the next step, you need to set the outer trimming frame. (1) This should be preferably drawn close to the book edge. To change the frame, position the mouse over the line to be shifted. The cursor will change it's appearance and the line can be pulled in the desired direction. The inner frame is then shifted towards the inside (2), so that the line stands close to the text. (See Abb. 3)

To offset the curvature of the book, the book is pulled flat and both sides of the book are pressed down with the thumbs. To then capture the scan, you use the self releaser (time scanning), as you also know from photo cameras. (See Abb. 4)

The time lapse until capture of a scan (between one second and 60 minutes) can be selected in Options->Software-Settings. After activating the button, the countdown is automatically started. The remaining time can be viewed under the preview area. Thumbs must be located between the inner and outer frame during a scan, where they will be automatically removed. The self releaser starts again after each scan. The time between the caturing of two scans should be selected, allowing you enough time to turn the page and hold the book flat again. With a little practise it is possible to scan many book pages in a relatively short period of time.